Introduction
notion api를 사용하는걸 araboza
# notion 개발자 사이트
Notion API
developers.notion.com
# 먼저 integration을 만들라고 한다.
Build your first integration
Make your first request to the Notion API.
developers.notion.com
여기에 자세히 적혀있음
https://www.notion.com/my-integrations
Your connected workspace for wiki, docs & projects | Notion
A new tool that blends your everyday work apps into one. It's the all-in-one workspace for you and your team.
www.notion.so
위 주소로 일단 들어가보자. 물론 notion 로그인이 되어있어야함.

새로운 integration을 만들자

워크스페이스 설정해주고 저장.
난 그냥 프라이빗으로만 쓸거라 유형은 프라이빗으로 했음.
로고 넣고 싶으면 넣으샘
난 이름은 testapi라고 적었음.

그다음 구성창으로 넘어가는데, 저기 '프라이빗 API 통합 시크릿'이 중요하다.
api요청할때 필요하다.
# 페이지 만들기 테스트
Working with page content
Learn about page content and how to add or retrieve it with the Notion API.
developers.notion.com
공식문서는 여기임
밑에 좀 내려보면
Creating a page with content라는 제목이 있는데

curl로 post요청하는 코드가 있는데 한번 따와보면
curl -X POST https://api.notion.com/v1/pages \
  -H 'Authorization: Bearer '"$NOTION_API_KEY"'' \
  -H "Content-Type: application/json" \
  -H "Notion-Version: 2022-06-28" \
  --data '{
	"parent": { "page_id": "494c87d0-72c4-4cf6-960f-55f8427f7692" },
	"properties": {
		"title": {
      "title": [{ "type": "text", "text": { "content": "A note from your pals at Notion" } }]
		}
	},
	"children": [
    {
      "object": "block",
      "type": "paragraph",
      "paragraph": {
        "rich_text": [{ "type": "text", "text": { "content": "You made this page using the Notion API. Pretty cool, huh? We hope you enjoy building with us." } }]
      }
    }
  ]
}'
일단 api 요청주소는 저 api.notion.com/v1~~/page 로 끝나는 요청이다
헤더값으로 NOTION_API_KEY가 있고 나머진 뭐 잡다한거..
그리고 데이터 부분이 중요한데,
parent에 page_id라는 값을 넣어줘야한다.
parent는 부모페이지. 즉 어떤 페이지에 이 페이지를 만들거냐는 거임.
그리고 아래는 제목으로 뭐라고 지어줄건지, 안에 children은 block object가 있는데 페이지 내용일거임
- 일단 페이지 아이디부터 따오자.

간단히 테스트용 notion api test라는 페이지를 만들었음.
얘가 위에 parent가 될거임.

페이지 우측 상단에 쩜쩜쩜 누르면 페이지 링크 복사할수 있음.
https://www.notion.so/<내아이디>/notion-api-test-<여기페이지아이디>?pvs=4이런식의 링크가 클립보드에 복사될거임
여기서 페이지 아이디를 따오자.
- parent 페이지를 api integration이 연결해야 한다.
이게 자세히 안나와있어서 ㅠㅠ 애좀 먹었다.

parent페이지가 될 notion api test페이지에서
우측상단 쩜쩜쩜 - 연결항목 - 아까 만든 testapi integration을 검색해서 연결해줘야한다.

그럼 이렇게 연결할거냐 하고 물어봄
안해놓으면 나중에 권한 문제가 생긴다.
즉 만든 integration이랑 이 integration에서 만질 수 있는 page를 설정해주어야 한다는것!!
# 이제 테스트를 해보자
# postman으로 먼저 해볼거임.
curl -X POST https://api.notion.com/v1/pages \
  -H 'Authorization: Bearer '"$NOTION_API_KEY"'' \
  -H "Content-Type: application/json" \
  -H "Notion-Version: 2022-06-28" \
  --data '{
	"parent": { "page_id": "494c87d0-72c4-4cf6-960f-55f8427f7692" },
	"properties": {
		"title": {
      "title": [{ "type": "text", "text": { "content": "A note from your pals at Notion" } }]
		}
	},
	"children": [
    {
      "object": "block",
      "type": "paragraph",
      "paragraph": {
        "rich_text": [{ "type": "text", "text": { "content": "You made this page using the Notion API. Pretty cool, huh? We hope you enjoy building with us." } }]
      }
    }
  ]
}'
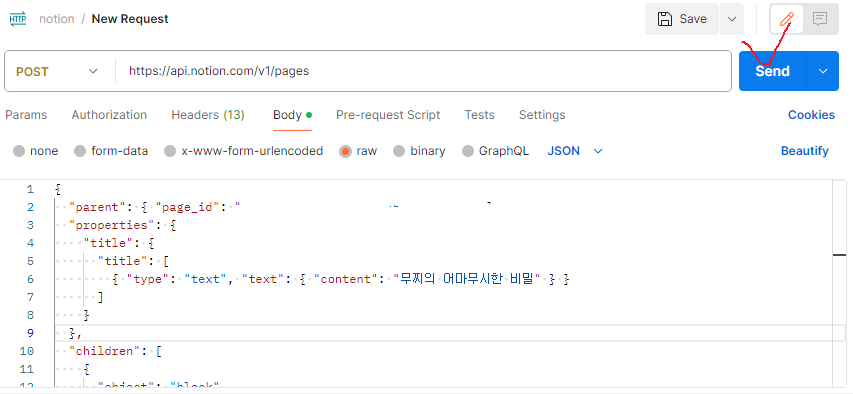
아까 curl 요청을 보니까 post요청으로 만드는거임.

헤더값에 저 content type이랑 notion version값 대충 떄려넣고
저 Authorization키에는 값으로 아까 통합integration만들때 나온 키 복붙해서 넣으면 됨
{
  "parent": { "page_id": "<여기에 아까 parent page아이디 값!>" },
  "properties": {
    "title": {
      "title": [
        { "type": "text", "text": { "content": "무찌의 어마무시한 비밀" } }
      ]
    }
  },
  "children": [
    {
      "object": "block",
      "type": "paragraph",
      "paragraph": {
        "rich_text": [
          { "type": "text", "text": { "content": "무찌는 똥싸개입니다" } }
        ]
      }
    }
  ]
}
이제 body쪽에서 보낼 JSON형식 데이터를 적을건데, 저기 parent 부분에 페이지 링크따서 페이지 아이디 따온거 넣으샘
그리고 title부분은 페이지 제목, content는 블록하나만 들어갔는데 원하는 텍스트 넣으샘.

그리고 요청을 보내보면

페이지에 하위페이지가 잘 만들어졌다.
{
    "properties": {
        "title": {
            "id": "title",
            "type": "title",
            "title": [
                {
                    "type": "text",
                    "text": {
                        "content": "무찌의 어마무시한 비밀",
                        "link": null
                    },
                    "annotations": {
                        "bold": false,
                        "italic": false,
                        "strikethrough": false,
                        "underline": false,
                        "code": false,
                        "color": "default"
                    },
                    "plain_text": "무찌의 어마무시한 비밀",
                    "href": null
                }
            ]
        }
    },
}
응답을 받았는데 눈여겨볼게 저런식으로 bold, color등으로 설정도 가능한것 같음.
# js 코드로 테스트해보기
reference에서는 curl과 js로 된걸 다 제공한다
const { Client } = require('@notionhq/client');

const notion = new Client({ auth: process.env.NOTION_API_KEY });

(async () => {
  const response = await notion.pages.create({
    parent: {
      page_id: '494c87d072c44cf6960f55f8427f7692',
    },
    properties: {
      title: {
        type: 'title',
        title: [
          {
            type: 'text',
            text: {
              content: 'A note from your pals at Notion',
            },
          },
        ],
      },
    },
    children: [
      {
        object: 'block',
        type: 'paragraph',
        paragraph: {
          text: [
            {
              type: 'text',
              text: {
                content: 'You made this page using the Notion API. Pretty cool, huh? We hope you enjoy building with us.',
              },
            },
          ],
        },
      },
    ],
  });
  console.log(response);
})();
이런식으로 코드생겼다고 한다.
이걸 내 식으로 바꿔보자면,
import dotenv from "dotenv";
import { Client } from "@notionhq/client";

dotenv.config();

const notion = new Client({ auth: process.env.NOTION_API_KEY });

(async () => {
  const response = await notion.pages.create({
    parent: {
      page_id: process.env.NOTION_PAGE_ID,
    },
    properties: {
      title: {
        type: "title",
        title: [
          {
            type: "text",
            text: {
              content: "자스에서 밝혀낸 무찌의 비밀",
            },
          },
        ],
      },
    },
    children: [
      {
        object: "block",
        type: "paragraph",
        paragraph: {
          rich_text: [
            {
              type: "text",
              text: {
                content: "무찌는 똥을 먹어요",
              },
            },
          ],
        },
      },
    ],
  });
  console.log(response);
})();
코드는 이렇게 된다.
참고로 .env에 페이지 아이디랑, api키 둘다 넣어줬다.
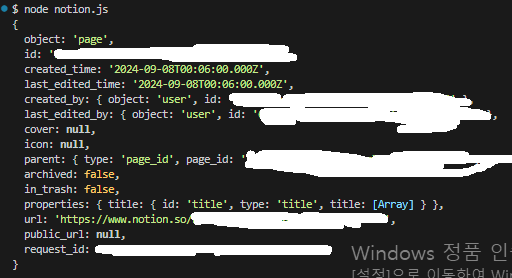
이걸 실행시켜보면
node notion.js
알아서 페이지가 추가된다.

응답은 이렇게 받았음
데이터베이스에 페이지 추가도 가능하고
대충봤는데 페이지에 블록도 저렇게 api로 추가 할 수 있고 그렇더라.
'etc > devTools' 카테고리의 다른 글
| postman / api test tool (0) | 2024.09.08 |
|---|---|
| vs코드 에디터와 터미널 focus 변경 단축키 만들기 (0) | 2024.09.08 |
| moba x term 아래로 생겨버리는 창 없애기 (0) | 2023.11.26 |
| telegram 메세지 api이용하기. (0) | 2023.03.31 |
| 텔레그램 메세지보내기 봇만들기 (0) | 2022.09.02 |